Today let’s talk about an important topic on how to partition hard disk without formatting. We know with every step we take into the world, we see new things being found in the side of the technology. As we move ahead, we tend to see more needs that arise for our self in regard with the technology. We all are smartphone users and PC users. Every place, from a home to a business place owes at least one computer depending on their needs. As we know, we have different needs; in this manner we use our PC according to our desire as per our works.

As everyone owes a PC, we know what a hard drive is. We use it to store in data. It comes up with different storage space as starting from 80 GB and goes on to even 4TB. When we use these hard disks, we might go on storing as much data and files we want in them, not utilizing the storage space. We at this point, try to partition it, as it will be easy for us to store in different files in different drives which will make it more comfortable to locate and browse the files easily. So for this purpose, we can divide the hard disk space into two. We can split it as 80 GB and another with the rest of the 120 GB from the total space of 200 GB drive. So this will help you solve a lot of problems relating to the storage problem and also storing in problems. But to split the hard disk, we have to format the drive.
To overcome this problem, I am going to show you a method in which you can partition hard disk without formatting it. By doing so, you can either extend or shrink the drive according to your wish. So let’s have a look at how to get it done.
There you will notice all the drives that are available in your PC. Chose the drive, which you want to split. If you want to shrink and create a new drive you have to have free space in the drive.
Next, you will see a new tab opened, in which you will have the ‘current size’ of the drive, the ‘free space’ and the size to which you want the drive to shrink into. Enter the exact amount and click enter.
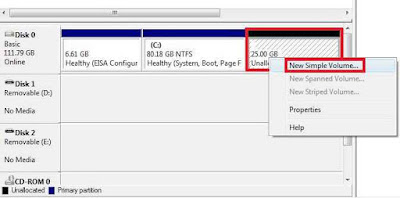
Then in the right bottom corner in the disk management window, you will have an ‘unallocated space’ . right click on it and select the option ‘new simple volume’.
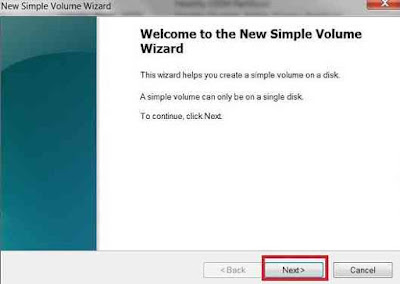
Next, your screen will lead to the ‘new simple volume wizard’, where you have to create the partition. Press ‘next’ to continue the process.
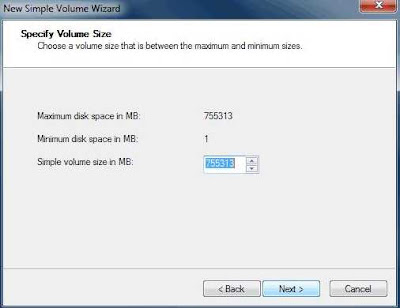
Then, you have to type in the volume size and press ‘next’.
Thereafter you have to assign the drive with the drive letter. Type in a letter that you wish.

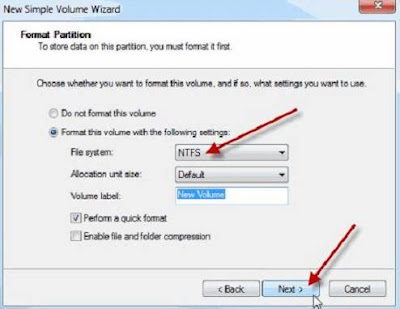
It will lead you to the ‘format partition’ page. Select the file system to ‘NTFS’ and then type in a name for your new drive and press ‘next’ button.
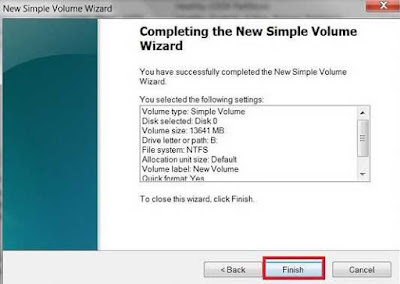
Now it will make a format of the drive and then your newly created drive will be ready to be saved in. press ‘finish’ to finalize.
That’s it. This way you can now shrink or enlarge you drive and partition it as you desire without formatting. Hope this was very useful for you to partition the hard disk without losing the data.
As everyone owes a PC, we know what a hard drive is. We use it to store in data. It comes up with different storage space as starting from 80 GB and goes on to even 4TB. When we use these hard disks, we might go on storing as much data and files we want in them, not utilizing the storage space. We at this point, try to partition it, as it will be easy for us to store in different files in different drives which will make it more comfortable to locate and browse the files easily. So for this purpose, we can divide the hard disk space into two. We can split it as 80 GB and another with the rest of the 120 GB from the total space of 200 GB drive. So this will help you solve a lot of problems relating to the storage problem and also storing in problems. But to split the hard disk, we have to format the drive.
To overcome this problem, I am going to show you a method in which you can partition hard disk without formatting it. By doing so, you can either extend or shrink the drive according to your wish. So let’s have a look at how to get it done.
Partition Hard Disk without Formatting
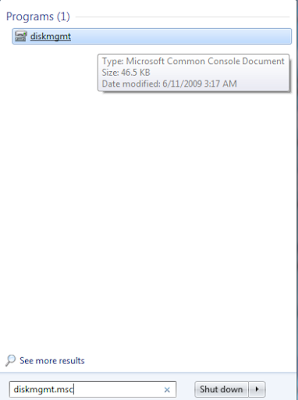
Firstly, click on the ‘start’ and type in “disk mgmnt.msg” without the quotation marks ( “ ”) and press enter for the disk manager window to open up.
Firstly, click on the ‘start’ and type in “disk mgmnt.msg” without the quotation marks ( “ ”) and press enter for the disk manager window to open up.
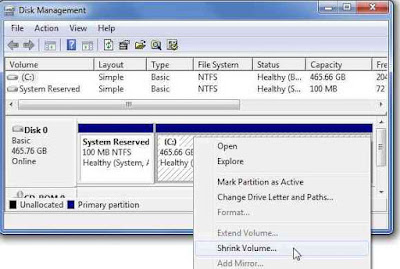
There you will notice all the drives that are available in your PC. Chose the drive, which you want to split. If you want to shrink and create a new drive you have to have free space in the drive.
After that right click on the drive letter that you want and select the ‘shrink volume’. This will take a few moments to complete.
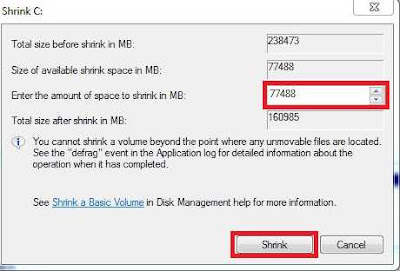
Next, you will see a new tab opened, in which you will have the ‘current size’ of the drive, the ‘free space’ and the size to which you want the drive to shrink into. Enter the exact amount and click enter.
Then in the right bottom corner in the disk management window, you will have an ‘unallocated space’ . right click on it and select the option ‘new simple volume’.
Next, your screen will lead to the ‘new simple volume wizard’, where you have to create the partition. Press ‘next’ to continue the process.
Then, you have to type in the volume size and press ‘next’.
Thereafter you have to assign the drive with the drive letter. Type in a letter that you wish.
It will lead you to the ‘format partition’ page. Select the file system to ‘NTFS’ and then type in a name for your new drive and press ‘next’ button.
Now it will make a format of the drive and then your newly created drive will be ready to be saved in. press ‘finish’ to finalize.
That’s it. This way you can now shrink or enlarge you drive and partition it as you desire without formatting. Hope this was very useful for you to partition the hard disk without losing the data.