View Call Statistics for Each Contact in Your Android

In the modern world, we have a lot of new things that has erupted into the world that the people of the past decade would never be able to imagine of. Those days they contacted people in ways of sending birds, beating drums and so many such methods but today? Today we have the ability to contact a person in the next split of the second. We can even have a live conversation with the video on. Not just that but the technology has got so advanced that we can have a group conversation with a video group chat too. Now we see everyone have groups opened and so there by we get to add as many members as we want and have a pleasant time chatting to others.

All these features are introduced to the very concept of the smartphone. Now everyone use a smartphone that it becomes easy for all the purposes. When we have the ability to contact another person and talk to them for as long as we want through a phone, we also have the ability to check for all the details and statistics of the same phone call. For an average of a day, we use the phone to talk to at least about 5 of our contacts. Analyzing this, we will not be sure of the amount of the time we used to talk to them.


Sometimes there comes a situation where we will want to know the call statistics of each contact. This can be used to check on the phones of others, maybe your kids, husband/wife, friends or anyone, to see how long they have had a conversation via call to each of the contacts. By checking so, we can have an idea of the time amount and this will also help us to have a clear view on the payment procedures that has been cut.

Now with android device, we can easily get any possible apps we want and thereby use it accordingly. To check the statistics of the cal history of each contact too we need the right app that’s trustable. So here today I am going to introduce you to two simple and the user friendly apps that will work perfectly in getting you all the stats of each contacts. Let’s take the look at the steps of how to get the apps to our android and how it works.


View Call Statistics for Each Contacts - Android


You have to get the app named 'Callistics-data usage, calls' directly from google playstore to your android smartphone or tablet.

Let's move on to know how to view all the call statistics for and every contacts in your android phone.
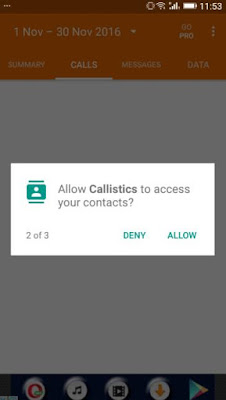
Firstly, launch the app and it will ask for you to grant permission for the app to work accurately. Tap ‘allow’ to continue.


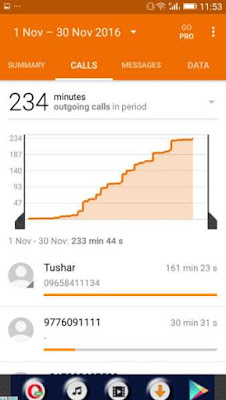
Next, the app will start to scan for all the call logs and details of each contact and then it will provide the report for all the calls.


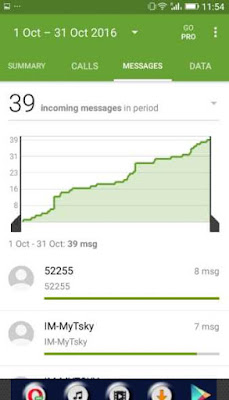
You can also get details of each of your messages. To browse this, tap on the tab ‘messages’.


Now, you can check for your data usage, by clicking on the tab ‘data’.


That’s it. You have successfully configured the app to view call statistic for each contacts in your android. So you can download this app directly from google playstore to your android smartphone by Clicking here.


Now using this app you can have a separate view of each of the call you make and also a statistics of your messaging details and your data usage will be provided too.

Launch Favorite Apps From Android Lock Screen

With so much of new updates coming up along our way, we keep our phone updated along with so many apps. Android smart phone is one of the user friendly device which gives accessibility to tons f apps in the app market. So with this advantage we take in charge and install as many as apps that we think we need. In this process we come across so many problems of browsing one by searching for it in among all the apps. So now we are going to see a small easy trick to launch our favorite apps from the android lock screen.

As with time, every day we see new apps coming into the trend. With all of them, we install the app that attracts us and the apps that we need the most. Every one of us uses social media and so we would have downloaded as many social media apps too in our phones, along with games apps and many more. So all of these apps will be flooded in our phone home screen.


Sometime in instance, we take a few minutes to find the app we want. We will not be able to click open the app we want soon as with all the apps we will get confused of where it is located. It can eat up our time and make us get irritated in a few seconds. To overcome this problem we have a lot of solution. And that very solution is also brought out through an app.

Using this app I am going to introduce you to, you can easily manage the most wanted apps and locate them in your lock screen, whereby you will be able to launch it from there itself. You will not be pushed to search for every page in the home for your favorite app. This method will also solve the problem of unlocking the screen and going in to open the app. For those who does multi tasking can now easily launch another app that you have located in the lock screen with ease. So let’s see how to get the app that will help create a shortcut to the apps by launching them from the lock screen.


Launch Apps From Android Lock Screen

You have to get the app named 'Hanger' directly from google playstore to your android smartphone or tablet.

Let's move on to know how to launch your favorite android apps directly from lock screen.
Firstly, launch the app and it will open up to a screen page like showed below.


In case you’re using an android marshmallow, then you will have to grant permissions to continue the process.


Then, in the general settings page, you will see the ‘notification bar’ option, enable it to proceed.


Next, to select the app to locate in the lock screen, tap on the ‘apps’ tab and chose the apps.


Now, all your selected apps will be pinned in your lock screen and also in your notification bar.


That’s it. You have successfully configured the app to launch your favorite apps from lock screen. So you can download this app directly from google playstore to your android smartphone by Clicking here.

Now you can easily access your most used apps and launch them from the lock screen itself. No time will be wasted. This works perfectly in managing all the other apps and giving you an ease by pinning the shortcuts in both the notification bar and the lock screen.

How to Share Purchased App with Family Members in Android

You must have learned so many interesting things today, so along with it add one more useful detail of how to share purchased apps with other android users into your pocket of knowledge. As we are in a fast moving world of technology, we see a family owns a smartphone each for everyone. In this process we do things differently, according to our wishes. What we store in our phones will always be private for others. We highly secure the phones, though we have useful stuffs to maintain or even if there are no confidential things in.

There is one thing in common that most of the android users use is the apps. We all get different apps for our desire and use it for our own need. Most of the instances, all of us get free apps. When we use free apps, we will not have to worry about anything, as there is nothing that we have to pay back. But when it comes to paid apps, we have to purchase them and have a payment done annually. This is not going to be cheap when each and everyone in the family have to purchase it separately. This will be a problem until you come to know that you can share the purchased app.


Yes, now as you know that you can share the purchased app among your family members or friends, you can stay relieved. This method will not make all the users to pay. Only one person who initially purchases it will have to make the payments and others can enjoy it free. It can be any paid apps, wither a music player, games or any official apps, you can easily share it among the other android users officially. 

Sometimes, there are people who don’t hesitate to share the payment among each others, as it gets cheaper when you divide it among two or three of you. This purchased app sharing method is officially available in the playstore. For those who were not aware of this, now worry not. As I am going to give you a complete guide, on how to get it done in two easy methods, one using the android Smartphone and the other by the web browser. Let’s take a look at the process step by step.


Share Purchased Apps in Android Phone

To start with the android smartphone, you have to open up the google playstore and click on the three lines that’s available on the top corner of the screen and select the ‘account’ option.


In the account, you have to press on the ‘family accounts’.

Then, click on the ‘sign up for family library’. Using this you can open a library from which you can easily share any purchased apps to your family members who use android.


Next, it will provide you with terms and conditions to proceed with. press ‘accept’ to continue.

Then you will be able to add your family members by typing in the email id of all the members you prefer to add in the sharing part.

It will create up a shared cloud from where your purchased apps will be able to be shared.

To make the purchased apps available for the other members, you have to enable the apps while you purchase it. The payments options and other restrictions can be adjusted in there.

That’s it. Now using this method, you can easily share purchased apps with your family members or friends officially in your android smartphone.


How to Share Purchased App in Web Browser

To share apps using the web browser, open the google playstore and go to the settings and select the option ‘account’. Select the family option and ‘signup for family library’.


Invite the family members by entering in their email ids, and then go on with the same procedure we followed in the Android sharing method and complete the payment method settings.


And then, after all the implementations, all the other accounts that you added using the email id will have the access to use your paid applications.

Using this tool, you can also keep an eye on the accounts of your other members, and check what app they are purchasing.

That’s it. Now we have checked on how to share apps officially with the help of the google playstore both using the android smartphone and the web browser. Hope this was helpful for you to share your purchased app with your friends and family.

How to Partition a Hard Disk without Formatting

Today let’s talk about an important topic on how to partition hard disk without formatting. We know with every step we take into the world, we see new things being found in the side of the technology. As we move ahead, we tend to see more needs that arise for our self in regard with the technology. We all are smartphone users and PC users. Every place, from a home to a business place owes at least one computer depending on their needs. As we know, we have different needs; in this manner we use our PC according to our desire as per our works.


As everyone owes a PC, we know what a hard drive is. We use it to store in data. It comes up with different storage space as starting from 80 GB and goes on to even 4TB. When we use these hard disks, we might go on storing as much data and files we want in them, not utilizing the storage space. We at this point, try to partition it, as it will be easy for us to store in different files in different drives which will make it more comfortable to locate and browse the files easily. So for this purpose, we can divide the hard disk space into two. We can split it as 80 GB and another with the rest of the 120 GB from the total space of 200 GB drive. So this will help you solve a lot of problems relating to the storage problem and also storing in problems. But to split the hard disk, we have to format the drive.

To overcome this problem, I am going to show you a method in which you can partition hard disk without formatting it. By doing so, you can either extend or shrink the drive according to your wish. So let’s have a look at how to get it done.


Partition Hard Disk without Formatting

Firstly, click on the ‘start’ and type in “disk mgmnt.msg” without the quotation marks ( “ ”) and press enter for the disk manager window to open up.


There you will notice all the drives that are available in your PC. Chose the drive, which you want to split. If you want to shrink and create a new drive you have to have free space in the drive.

After that right click on the drive letter that you want and select the ‘shrink volume’. This will take a few moments to complete.


Next, you will see a new tab opened, in which you will have the ‘current size’ of the drive, the ‘free space’ and the size to which you want the drive to shrink into. Enter the exact amount and click enter.


Then in the right bottom corner in the disk management window, you will have an ‘unallocated space’ . right click on it and select the option ‘new simple volume’.


Next, your screen will lead to the ‘new simple volume wizard’, where you have to create the partition. Press ‘next’ to continue the process.


Then, you have to type in the volume size and press ‘next’.


Thereafter you have to assign the drive with the drive letter. Type in a letter that you wish.


It will lead you to the ‘format partition’ page. Select the file system to ‘NTFS’ and then type in a name for your new drive and press ‘next’ button.


Now it will make a format of the drive and then your newly created drive will be ready to be saved in. press ‘finish’ to finalize.


That’s it. This way you can now shrink or enlarge you drive and partition it as you desire without formatting. Hope this was very useful for you to partition the hard disk without losing the data.

How to Stop Phone Alarm Clock Using Your Voice

The world has turned out to be so busy, that we are forced to wake up in the next morning and run to the work in a daily basis. Waking up in the morning is the biggest struggle in this whole process. We all have the habit of setting up alarm to wake up on time. But turning on and off the alarm manually is not an easy task to do with a sleepy face and eyes half closed. So for those who wish for a change in your daily routine with the defeat between you and your alarm, I have something really great that will help you stop the morning alarm with your voice.

Wondering what’s that about? Ok, let me explain. Every morning we should wake up with a good mood as the day should start with something pleasant. But everyone starts up with a big fight with the alarm set in your phone. With that half open sleepy face, we are made to search for our phone and stop the alarm. Sometimes, as we are almost sleepy while we stop the alarm, we might press the wrong snooze button instead of the stop and so the alarm will start to ring back again in another few minutes, where you have to walk to your android phone and turn it off once again. This actually spoils the mood in the very morning and brings an unpleasant start instead of a kick off start. Not only you, but every one of us goes through this struggle every morning or the other. How to relate this incident and bring a new way to stop the alarm from ringing?


We are all born in a technologically developed world, whereby we will definitely have solutions for most of the problems that are based on the technology. Android smartphone are one device that has so many features that helps us from most of our problems. So this very early morning struggle has an end too. We can now stop our android alarm by commanding it with your voice. You can say ‘stop android’ and the alarm will stop. The voice recognition alarm will easily accept your command and stop ringing. So in the morning you have not to have fight with your phone and your sleepy face. Just a command and the problem will be solved.

All you need to do to get this easy feature updated in your phone is one simple app that has this cool feature. So here I am to help you with the right app that will work perfectly without any errors or problems. Let’s take a look at how to get the app in a step by step procedure.


Stop Phone Alarm Clock Using Your Voice

You have to get the app named 'Wakevoice alarm clock' directly from google playstore to your android smartphone or tablet.

Let's move on to know how to stop phone alarm clock using your voice in the morning.
Firstly, launch the app in your phone and chose the time and set your alarm.


Next you have to enable the speech synthesis and the voice recognition by inserting a tick. Voice recognition is used to recognize your voice and stop the alarm by the app and the Speech synthesis is to display the weather widget in your screen when the alarm rings.


You can check out the alarm voice stop by pressing the test on the app.


Then you will see a dialog box will appear with a goggle listener and you can test it by saying ‘stop’.


By doing so, your alarm will stop and also it will forecast you with all the weather, news and horoscope details. You can adjust and change the app to customize it accordingly in the settings tab of the app.


That’s it. You have successfully configured the app to stop phone alarm clock using your voice. So you can download this app directly from google playstore 
to your android smartphone by Clicking here.

Now using this method you can save your time and start off the day in a pleasant way by commanding your android phone alarm clock by just saying ‘stop’. Simple and easy right? Hope this will make your day.

How to Find Your Missing or Stolen Windows 10 Device

In this modernized world of technology, every works are made easy with different equipment. Today we use smart devices to make things less complicated. So in this case each of us might use different types of smart devices such as tablets, laptops. A smart device is light in weight and flat, so it makes it more compatible to carry along with us. This can sometimes lead us to a situation where we might forget our smart devices somewhere or there are even chances for it to be stolen. So let’s focus on how to find a lost windows 10 device.

Windows 10 devices comes with many inbuilt facilities that makes the users love the system so much. It is said to be a user friendly device. Among all the facilities that’s found in a windows 10 device, the most amazing feature is the ability to find a lost or stolen device using its inbuilt feature. Most of are not aware of the fact that this particular feature is available in the device. With this availability of finding a lost device, now those who are worrying of you lost Windows 10 device, have nothing to fear about. It is pretty normal to forget our smart tab or mini laptop, which we placed on the chair in a park or on a table at a party. We might forget it and come home and then realize the device is missing.


At this point we will not remember where we kept it or how we lost it. It would definitely be desperate to have your device lost as you may have so many things stored in it and a device is a valuable possession this generation owns. So to find out the device from the place you lost it, or of the place the stealer is using it, all we need is to wait for our windows 10 device to get connected to the internet. That’s it, with the help of the internet connected and the inbuilt feature of finding the exact location of where the device is, we can easily trace our windows 10 devices.

This is pretty easy right? So for those who are eager to know about what happens and how this feature works, come let’s take a look at the procedures and find out where the device is.


Find Missing or Stolen Windows 10 Device

To find out a lost windows 10 device, you should first have made some settings in your device. So that, when it’s lost, you will easily be able to find it. The very first thing to do is to create a Microsoft account in your device and then make sure that your device is fully updated to the windows 10 updates and running on it.

Then you have to go to the settings tab and their click on the ‘update and security settings’ option.


Next, under that you will have to tap on the ‘find my device’ which will lead you to more settings on its left side of the screen. There you will be able to adjust the settings where it will allow to trace the current status from the text line that’s highlighted. Then you have to enable the ‘find my device’ feature, which will be disabled by the default.


After enabling the ‘find my phone’ you also have to toggle the button to enable the ‘save my device’s location periodically’. This will enable the feature of tracking the location in your phone whenever needed.


Later, when you want to find your lost or stolen device. All you have to do is, go to “accounts.microsoft.com/devices” from another device and then sign in to your Microsoft account. (the account you used to sign in your windows 10 lost device). By signing in you will be able to see all your devices listed.

Now you will see many links if your mail id is connected to other devices, so from there you have to select your lost device from the ‘find my device’ links and click on it.


Then it will show up for the last available location and the exact location from the map and also it will provide you the time it has last traced your device.

That’s it, this way, you can find the location of your lost or stolen windows 10 device. In case it doesn’t show you the location,that means that the stealer has somehow managed to get into your device and disabled the ‘find my device’ settings. So all the windows 10 users, soon turn on this settings and keep your mobile safe.

Popular Posts

Popular Posts